Mobile homes are known for being affordable and flexible. However, the subfloor of a mobile home can wear out or rot over time due to moisture and age. Thankfully, you don’t always need to replace the entire flooring. With the right tools, materials, and careful steps, you can repair your mobile home’s subfloor and make it solid again. This guide will walk you through everything you need to know for a safe and efficient subfloor repair project.
Understanding What the Subfloor Does
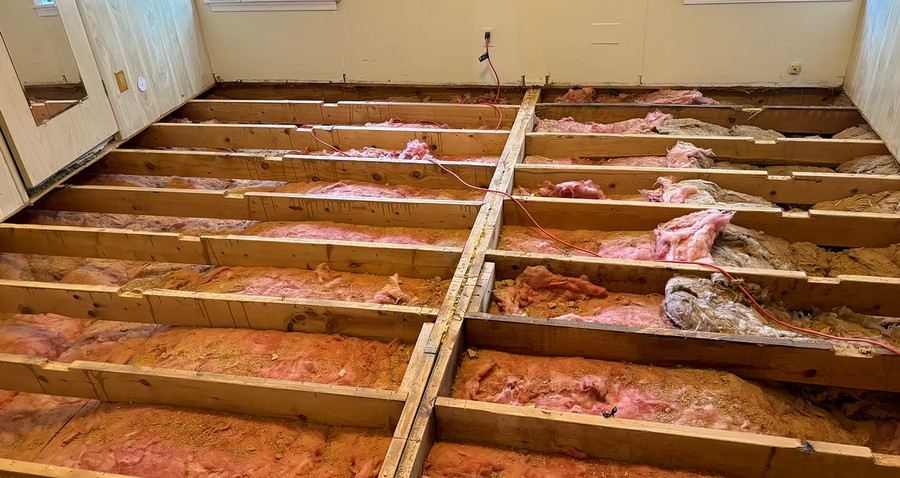
The subfloor is the foundation of your mobile home’s flooring system. It supports insulation and floor coverings, usually made of plywood or particleboard over the steel frame. Unlike traditional homes, mobile homes use lighter materials for easy transport.
Because of this design, mobile home subfloors are more vulnerable to water and humidity damage. Regular inspections help prevent rotting, sagging, or mold buildup. When replacing or repairing, always make sure leaks are fixed first to prevent future issues.
If you’re not confident about carpentry work, professional assistance is recommended. However, homeowners with basic skills can handle small repairs safely by following the right process.
How Mobile Homes Are Built
Mobile homes are factory-made using lightweight materials and a metal chassis, which makes them movable. Their walls often consist of wooden studs with paneling or drywall. Newer models even feature insulation layers for better efficiency.
The roofing is typically metal or shingled, sometimes flat for a modern look. Because of these differences, the repair techniques for the subfloor of a mobile home require precision and awareness of its unique structure.
Should You Replace Flooring Yourself?
Replacing flooring is possible as a DIY project, but you must be cautious. If you’re not comfortable with power tools or carpentry, hiring a professional may be safer. DIY, however, can save hundreds of dollars if done correctly.
Before starting, check that you have the necessary tools, such as saws, drills, safety gear, and measuring tools. Always address water leaks before replacing flooring, or the new subfloor will eventually rot too.
Here’s what you’ll need:
- Safety gloves and goggles
- Tape measure and level
- Hammer, screwdrivers, and wrenches
- Electric drill and circular saw
- Construction adhesive or wood glue
- Plywood or OSB subfloor material
- Optional insulation material
Fix Leaks Before Replacing the Subfloor
Water damage weakens your flooring, so inspect your home for leaks before beginning repairs. Leaks can stem from plumbing or roof issues. If you notice wet spots, fix them right away.
Ignoring leaks means future repairs will be more expensive. For serious cases, contact a qualified technician. Preventive maintenance of your roof and plumbing will help extend the life of your repaired subfloor.
Step-by-Step Process for Replacing the Subfloor
- Remove furniture and use a circular saw to cut around walls.
- Inspect joists for water or pest damage.
- Replace damaged joists before moving on.
Once ready, follow these key steps:
- Cut and remove damaged subfloor sections along the walls.
- Cut between joists using a saw for easier removal.
- Inspect and repair joists as needed.
- Add insulation between joists to improve energy efficiency.
- Lay down the new subfloor panels, staggering seams for stability.
- Use screws instead of nails to secure the boards.
- Install the final floor covering of your choice.
After installation, check for squeaks or uneven areas. Walk across the new floor to confirm stability before moving furniture back.
Choosing the Right Floor Covering
When the new subfloor is ready, choose a durable top layer. Popular options include laminate, tile, or carpet. Make sure the subfloor is clean before installation. Floating floors require expansion gaps, while tiles work better with cement fiberboard underlayment to resist moisture.
Finish by adding baseboards to hide gaps and protect your walls. Once complete, your mobile home will feel brand new.
FAQs About Mobile Home Subfloor Repair
How much does it cost to replace the subfloor of a mobile home?
Depending on the damage, it can cost between $500 and $3,000 for materials and labor.
Can I repair a small section of the subfloor?
Yes, you can replace only the damaged area if the surrounding structure is still strong.
What type of plywood should I use?
Use 3/4-inch treated plywood or OSB for durability and moisture resistance.
Do I need to remove the old floor before fixing the subfloor?
Yes, removing existing flooring helps you inspect and repair damage thoroughly.
How can I prevent subfloor damage in the future?
Regularly check for leaks, maintain plumbing, and keep humidity levels low.
Is insulation necessary under the subfloor?
Yes, insulation improves comfort, energy efficiency, and soundproofing.
Can I walk on the subfloor before finishing?
You can, but avoid heavy loads until the surface is completely secured.
What causes most subfloor damage?
Moisture, leaks, and poor ventilation are the most common causes.
Do I need a permit for subfloor replacement?
Some localities require permits for major repairs. Always verify with your housing authority.
Where can I get professional help?
You can contact The Mobile Home Dealer for expert advice and services on mobile home maintenance.
Bottom Line
Repairing the subfloor of a mobile home may seem like a big project, but with careful planning and proper tools, it’s manageable. Address leaks first, use quality materials, and follow each step diligently.
If you’d rather leave it to professionals, The Mobile Home Dealer can help guide you through your options. With a strong and properly installed subfloor, your mobile home will remain safe, comfortable, and durable for years to come.
See Also:
- Mobile Home Investing: 2026 Guide
- How Much Does it Cost to Move a Double Wide Mobile Home in 2026?
- Living In Senior Mobile Home Parks: All You Need To Know About 55+ Communities in Sarasota, Florida
- Discover the Top 10 Age-Qualified Mobile Home Parks in Sarasota
- 10 Fun Ways To Spend Easter Weekend While In Sarasota FL!